Tuesday, December 13, 2011

Embraer Panels

It's always a privilege to be able to help someone with their build (and offers us interesting challenges) and one of our more recent custom jobs was to design and manufacture both the Landing Gear Panel and the MIP Annunciator Panel for an Embraer 120 home cockpit.

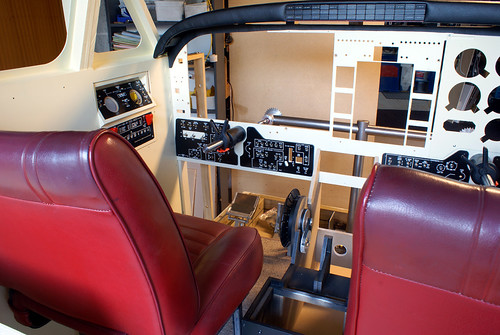
Below is the photogragh of a real Embraer cockpit that we based our designs on (click for a larger image) ...


Original photo courtesy of Juergen Lehle


And pictured above is the Landing Gear Panel completed and with all of its associated hardware fitted, with the exception of the gear lever itself - the wiring will all be done at the time of installation. Although the panel sizes were pre-determined, the panel itself was constructed with our own 2-position gear lever in mind, as this will eventually be fitted once in the simulator. The lever can actually be attached directly to the rear of the panel, although it wasn't required for us to do so in this instance.


Here we have a couple of the LEDs temporarily hooked up and under test. The entire panel is to be backlit using flood lighting and has been constructed from opal material to accommodate this whilst also trying to maintain some semblance of text clarity when unlit. Different grades of opal (and camera angles!) can give different results - and the reduced contrast of a grey panel and opal text can occasionally cause nightmarish problems.


Here we have the MIP Annunciator Panel, although without any warnings, cautions, or indicators lit, there's not really very much to be seen.


Each annunciator is a separate entity, which means that removal for updating, replacement, re-positioning, or otherwise is easily done. This can be helpful because, as we all know, needs (and software) change and progress over time.

The following photo (somewhat obviously!) shows the annunciators being tested in dark conditions, which most often is the normal environment for a home simulator whilst in operation, and allows us to check for any light bleed. The LEDs shown here (as well as not necessarily reflecting their rightful colours, as we didn't have ready access to the correct colour placements) are incredibly bright.


The brightness of the LEDs is perhaps better illustrated below: under workshop lights and with the camera flash also. The legends are still clear to see if activated.


The above Embraer parts are available on request now, although they won't be making an appearance on our website until the New Year, as I'll be updating the website with various new products and developments over the Christmas Break. 

Thursday, October 14, 2010

Over the captain's shoulder

In lieu of any significant post, this is simply another update photo of the C90 simulator currently being built in our workshop.

Additional photos are available here and I'll be upping more over the next few days until I've used 100% of our monthly Flickr allowance.

Tuesday, October 5, 2010

General Update

As you might've noticed, this blog has been sadly lacking in new content for the past few months, although this isn't because I've not been busy - just the opposite in fact! The ATR has even needed to be put to one side for a while, as our new project involves the construction of a complete King Air C90 simulator.

The entire process has been documented in detail and I plan (as time permits!) to write some dedicated posts relating to different sections of the build. In the mean time however, here are a couple of photos showing the progress so far ...

The initial construction pieces as they were unpacked

The basic structure of the cockpit (temporarily) together as one

Rudder pedals ready for installation

The latest view over Captain's shoulder

The glareshield annunciators lit up under test

Free Demo Version of Monitor FSUIPC Data

Now available for free download is a demo version of our Monitor FSUIPC Data program, available through Mediafire via the link below.

Note: Link has been updated as a new version (Windows 7 and/or 64-bit compatible) has just been released ...

Monitor FSUIPC Data (Demo Version)

The ZIP file contains a file called Monitor FSUIPC Data Demo Setup.msi which when double-clicked will begin the set-up process. We recommend that you let the program install itself automatically to the destination it chooses, as if you decide to purchase the Full Version later on it will be installed directly over top of this demo. This will also make it easier to apply any future updates that are made to the program (which will be made available free to all registered users of the Full Version)

The list of available offsets in the demo version above (from which you can view data) is limited to the following:

- Aileron Trim
- Alternator Switch
- Altitude of Aircraft
- AP Vertical Speed Hold
- AP Vertical Speed Value (ft/min)
- Bank
- Engine 1 Fuel Pressure
- Flaps Control
- Fuel Centre Tank 1 Level (%)
- Gear Control
- Lights - Cabin

No registration is required.
There is no facility to add your own 'Custom' offsets in the demo version.

More details on this product are available here ...

Tuesday, April 27, 2010

Furio: Power on update!

It was a nice surprise to receive a link to the following video clip in my inbox this morning: a 'power on' update of the Furio mentioned in my last post. There's some nice shots of our panels on display and under working conditions too, which is a delight to see.


Such a beautiful little plane!

Edit: And here's a clearer photograph of the main instrument panel.


Wednesday, April 21, 2010

From sim parts to real ones!

Carrying on from (and tying in with) my last post regarding the trip to Wanaka, lately we've had the priviledge of designing and manufacturing some panels that will eventually be fitted to the latest LN27 Furio RG, a gorgeous Italian-designed kitset plane that's supplied by Falcomposite.

Here's a clip of the (prototype) Furio in action:
she's a racy little beauty!


We hadn't really been expecting to manufacture products that would be used in real aircraft, but the panels and annunciator boards that were required posed no particular issues for us.

Once all of the calculations had been made and the drawings finished to scale, my son (who has a lot of experience in graphic design) was given the task of making the associated engraving attractive and befitting of the aircraft's sleek look.

The following photographs detail the process:

It was a luxury to actually be sent a full prototype faceplate of the main instrument panel, as this allowed us to test the placement and proper fitting of the panels that we'd initially constructed from the original CAD drawings we were supplied with.

These circuit breakers that I'm testing in this photograph were also supplied and were the exact same model as those destined to be fitted upon completion of the circuit breaker panel.

This is the initial bare example of the circuit breaker panel fitted over the faceplate to ensure that all of the holes were correctly lined up.

This is a shot of the almost completed circuit breaker panel - all that remained to do from here was to colour some of the more-important text bright red.


The next component to be manufactured was the annunciator panel. Above is a photo of its initial layout with spaces for the Lamp Test pushbutton and all necessary annunciators.


I designed a circuit board especially for this panel as there was limited space to work with and not much room depth-wise behind the main instrument panel either.


Here's the completed design of the panel from the front ...

And from the rear, a nice compact PCB with all of the LEDs sitting in place.


Initial tests regarding the brightness of the lit annunciators and the effectiveness of various different intensity LEDs were done, as they needed to be easily viewable under bright daylight conditions, which is a little different than the normal dark rooms where most sim pits are built of course! So that explains the relative 'bleed' we've allowed on the normally dark black annunciators.

More testing of the LEDs, this time with all of them lit.

And here is the final panel we designed, which holds the flaps, speed brake, and landing gear.

Hopefully we can get some pictures of our panels sitting in the Furio's cockpit once its construction has been completed. Exciting times!

Sunday, April 18, 2010

Warbirds Over Wanaka 2010

Today's post is a slight deviation from the normally discussed 'simulator' aircraft on this blog, as a couple of weeks ago I had the priviledge of attending Warbirds Over Wanaka 2010 with a friend of mine who'd mistakenly acquired a spare ticket for a family member who was unable to attend. This was the third time I've been down to the bi-yearly event; my last trip was back in 2006 when myself and several friends flew down from Christchurch on the fabulous DC3 and back again on the same day.

As well as being a pleasant drive through a beautiful part of our country, following are some photographs I took at the event itself - and seeing as I've already mentioned the DC3, that aircraft seems as good a place to start as any ...


Barrel rolling around the DC3 - how else would one announce another plane's arrival at an airshow?

This Mitsubishi Zero fighter was the centrepiece of this year's event as there are only three airworthy examples of them around the world, with this plane here being one of only two that's still currently being flown. It was also only the second time that a Zero has been flown in New Zealand.


The Japanese Zero flying amidst a backdrop of some majestic 'Lord Of The Rings' scenery.

A nice rear view shot displaying the de Havilland DH 100 Vampire's famous twin-boom design.

Here we once again have the Vampire, this time flying alongside the beautifully proportioned P-51 Mustang and an Aero L-39C Albatross.

Another shot of the Mustang, this time of its underbelly.

And of course its comparable British equivalent, the beautiful Supermarine Spitfire, which (below) certainly cuts a nice silhouette across the sky. Spectacular!


Here's the Soviet-built Lavochkin La-9 "Fritz" taxing down the tarmac.

An aggressive-looking Curtiss P-40 Kittyhawk bearing the immediately recognisable paint scheme of the 'Flyer Tigers'.

A close-up photograph of a parked Chance Vought F4U Corsair followed by a shot of it in flight.


A steeply inclined Kaman Seasprite helicopter!

Above is a Lockheed C-130 Hercules coming in on a decidedly steep approach!

And here it is rapidly departing! It's an impressive-looking beast!

These are four F/A-18 Hornet fighters that flew over from the Royal Australian Air Force. They were actually here on exercises with the Royal New Zealand Air Force but took some time out to fly down and put on a show.

The stylish LN27 Furio RG by Falcomposite.
We've actually been designing and manufacturing some panels for this aircraft over the past couple of months or so but that'll be discussed in another post that'll be completed very shortly, as it's a bit involved and not entirely related to my trip to Wanaka (the post is currently in the editing stage!) ... It's a beautiful little plane though. And very fast!

German wing-walker Peggy Krainz standing atop a Boeing Stearman Biplane as it exits a loop.

An attractive Yakovlev Yak-9 preparing for take-off.

Here's an AT-6C Harvard painted in RNZAF colours tearing down the runway ...

A graceful pair of de Havilland's flying past. I think the one on the left is a DH 89 Dragon Rapide.

Above is a photograph of a cruising Consolidated PBY Catalina, and below is a shot of it preparing for a water landing. Of course, with no water in sight, it was simply a fly-by!


And now all that's left to do is to go out on a bang with a fitting pyrotechnic end to this post!

Note: I've uploaded these photos and several additional ones to my Flickr account as well, which can be viewed here. I also took more than 500 photographs whilst I was down there, so if anyone has any requests to see certain makes or models please ask ...